What is "The Green Art Box?" A collection of environmentally friendly kids' art projects that are; clever, imaginative
and easy-to-create! Inspired by the reuse of common household recyclables! A handy resource for teachers, parents
and home-school art curriculums. Create "green" art today!  © 2009 Broken Box Designs™

Tuesday, August 26, 2008

Cookies-In-A-Jar


PROJECT OVERVIEW:
For kids to mix the creativity of baking with art. This project includes: baking terms, fractions, measuring ingredients... as well as how to decorate and be artistic. Keep in mind there are many variations that could be done with this project.

SUPPLY LIST:
- 1 liter glass jar and lid
- scrap decorations: (scrap papers, ribbons, buttons, glitter, etc...)
- brown paper bag
- adhesive double sided tape
- glue
- marker, paint, etc

COOKIE INGREDIENTS:
- 3/4 cup packed brown sugar
- 1/4 cup white sugar
- 1 1/2 cups mini candy-coated chocolates
- 2 cups all-purpose flour
- 1/2 teaspoon baking soda
- 1/4 teaspoon salt

DIRECTIONS:
REMINDER: Wash your hands before you begin and make sure the counter top and supplies used are all clean.
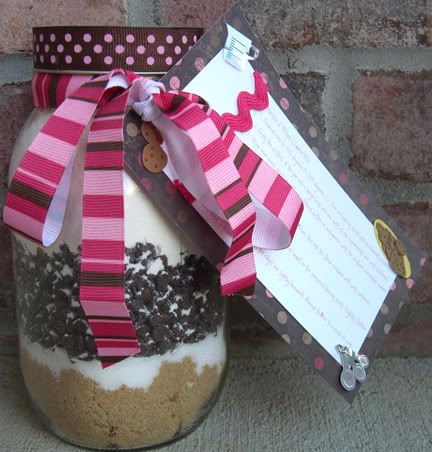
1) Decorate the lid of jar as you wish with scrap decorations. Set lid aside to dry if necessary.
IDEA: Use a 9" fabric circle to cover the jar lid and then tie with ribbon or yarn. Add stuffing beneath fabric to give a puffy look.One 1/2 yard of fabric makes 8 fabric jar covers.

2) In a clean 1 liter sized glass jar layer the ingredients in the following order:
1st Layer (bottom of jar): 3/4 cup packed brown sugar
2nd Layer: 1/4 cup white sugar
3rd Layer: 1 1/2 cups mini or regular candy-coated chocolates
4th Layer: (READ CAREFULLY) **In separate bowl mix: 2 cups all-purpose flour, 1/2 teaspoon baking soda and 1/4 teaspoon salt. Then, add this mixture as the 4th layer in your jar.

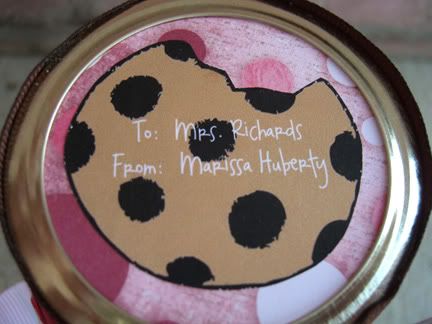
3) Create a recipe card for the cookie mix using scrap papers (roughly 3x5 size) and decor. Print or hand-write the recipe listed below so that your gift recipient can easily follow the recipe to prepare the cookie mix. Hole punch upper left corner of recipe card.

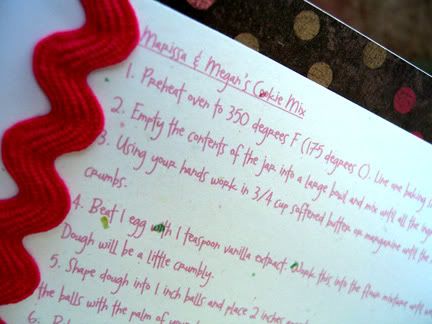
RECIPE: Candy-Coated Chocolate Cookies
1. Preheat oven to 350 degrees F (175 degrees C). Line one baking sheet with parchment paper.
2. Empty the contents of the jar into a large bowl and mix until all the ingredients are well combined.
3. Using your hands work in 3/4 cup softened butter or margarine until the mixture resembles coarse crumbs.
4. Beat 1 egg with 1 teaspoon vanilla extract. Work this into the flour mixture until well combined. Dough will be a little crumbly.
5. Shape dough into 1 inch sized balls and place 2 inches apart on the prepared baking sheet. Slightly flatten the balls with the palm of your hand. Bake at 350 degrees F (175 degrees C) for 10 to 14 minutes or until the edges are lightly browned. Remove cookies to a rack to cool. Makes about 2 dozen cookies.
NOTE: Mix is good up to 6 months (without nuts) and 3 months (with nuts).

Wednesday, August 13, 2008

Character Collection


OBJECTIVE: For kids 6+
To explore typography and different fonts by collecting the same letter/character. Kids are encouraged to hunt for unique, funky, different fonts... all of the same letter. Search for different fonts such as: cursive, decorative, bubbly, block, digital, calligraphic, hand drawn, scribbly, etc. NOTE: the differences of each letter are in the SHAPE of the letter (font) NOT the color.

SUPPLY LIST:
- card board backing (cereal box cardboard works great)
- scrap printed materials such as: newsprint, magazines, catalogs, bulk mail, TV guides, etc.
- glue or glue stick
- scissors

DIRECTIONS:
1) Find a piece of card board to use as backing (something roughly letter sized) such as a medium sized cereal box or pasta box (cut out a side of box to use as your backing)

2) Select a letter of the alphabet to "collect" ... kids can do their favorite letter, their initial, it doesn't matter but just choose ONE letter.

3) Go through magazines, newspaper, junk mail, packaging, etc. and cut out a wide assortment of the letter chosen. Aim for 20-40 pieces to design with. NOTE: Don't be concerned with the color of each character, instead - focus on the SHAPE of each character.

4) Arrange the different pieces on top of cardboard backing - don't glue down till each letter is in place... the pieces will need to be puzzled together. Cover the entire cardboard backing - so that there is little space between the letter pieces. Keep the letters upright, so that the fonts can be compared easily (this is a collection of one character in the alphabet).

5) Once the design is configured, glue down each piece. Then, lay a heavy book on top so that it dries flat.

6) Hang on your bedroom wall as modern art. Consider having this framed for an ultra artsy and personalized look! :)

Wednesday, August 6, 2008

Dotted Color Wheel


PROJECT OVERVIEW: For kids 6+
This exercise is an educational way to learn about the color wheel. Further, kids will learn that there are many different shades of each color - thus, no 2 colors are exactly the same even though we classify them as "red" or "blue."

SUPPLY LIST:
- scrap paper (magazines, wrapping paper, junk mail, empty packaging, coupons, etc)
- stiff cardboard or cardstock (letter size)
- hole punch
- ruler
- glue or glue stick
- black pen/pencil

DIRECTIONS:
1) Use a large plastic lid to trace a large circle (using black pen) on your piece of card-stock.

2) Use a ruler and black pen to divide your circle into 6 uniform pie pieces (as shown in attached color wheel).

3) Label each section by color (this will get covered up by paper, just use as a guide). Set drawn out wheel aside.

4) Search through scrap papers (magazines, wrapping paper, junk mail, empty packaging, coupons, etc) to find samplings of the 6 colors on wheel (red, orange, yellow, green, blue, purple). NOTE: you want many different shades of each color... the blue in blueberries is not the same as blue sky.

5) As you find samples of each color, hole punch out the swatches and glue onto the appropriate section on color wheel. Continue to "file" each color sample into the appropriate section on wheel until each color section is completely filled by dots.

6) When dry, label each color section around outer edge as "Reds" or "Blues" ... this shows that there are many variances within each color.

Self Portrait Collage

PROJECT OVERVIEW:
This should pretty much be a free-for-all type thing... focussing on really using found materials to "draw" the portrait. Materials such as: cereal boxes, magazines, newspapers, bulk mail, candy wrappers, caps, buttons, cut plastics (from packaging), labels, fabrics, tin foil, yarn, foam, etc, etc!! Kids are encouraged to find materials with a variety of textures and dimensions. The collage doesn't have to just be made of paper for example... the collage should have a 3D look.

Children can interpret this differently and hopefully use materials that represent themselves... for example, if one's favorite candy is skittles... maybe that makes its way into the collage. The self portrait will most likely look like an abstract version of each child - but could also incorporate their favorite things and hints of their personality/family/home ,etc.

SUPPLY LIST:
- paper backing such as cardboard or cardstock (to build collage on)
- "found materials" such as: cereal boxes, magazines, newspapers, bulk mail, candy wrappers, caps, buttons, cut plastics (from packaging), labels, fabrics, tin foil, yarn, foam, etc, etc!
- glue or tape
- sissors

DIRECTIONS:
1) Find a piece of stiff cardboard to build your portrait on

2) Collect various "found materials" as mentioned above, to build your self portrait. Consider incorporating items that are unique to you or represent you.

3) Use the materials to "draw" your self portrait!

4) Let dry then hang somewhere to express yourself!

REMEMBER:
No rules!! - Except be creative!

A Dozen Months of Fun


PROJECT OVERVIEW:
Use an empty egg carton to create a carton to hold 12 fun things to do, one for each month. For example: go camping.... or build a tree house.

Each compartment in the egg carton will hold a little strip of paper with something fun to do written on it. Then, at the beginning of every month, pull out the slip and do what the paper says!

SUPPLY LIST:
- empty egg carton (make sure it's clean)
- glue or tape
- marker, pen, etc.
- card stock (can be from a recycled material as well)
- scrap paper/construction paper (consider recycling junk mail, unused magazines, newspapers, etc)
- miscellaneous embellishments: yarn, buttons, glitter, confetti, stickers, beads, ribbon, etc.

DIRECTIONS:
1) Cover the top of an empty (clean) egg carton with scrap papers/construction paper. Use junk mail, old magazines, newspapers, etc. when possible. Consider making fun shapes and overlapping to create a unique design, but leave room for the title of this little game, "A Dozen Months of Fun." Decorate the inside if you like.

2) Add "A Dozen Months of Fun" to the top. Do this however you like: with marker, stencils, stickers, paint, cut paper, etc. *One cute "green" idea might be cutting out the letters from old printed materials to form "A Dozen Dinner Topics," then glue to the top of carton.

3) Embellish your carton more with fun/colorful designs formed from: yarn, buttons, glitter, confetti, stickers, beads, ribbon, etc.

4) Create 12 fun things to do for each month. Brainstorm with a parent or sibling so that the whole family will enjoy. Cut 12 small strips of paper (any type), roughly 2"wide x 1/2"high and write a different fun idea per strip.

5) Once your carton is dry and ready to fill, place one fun strip in each compartment... filling all 12. *Fold the strips to fit nicely in each spot.

6) At the beginning of every month, pull out the fun strip and do what the paper says!