
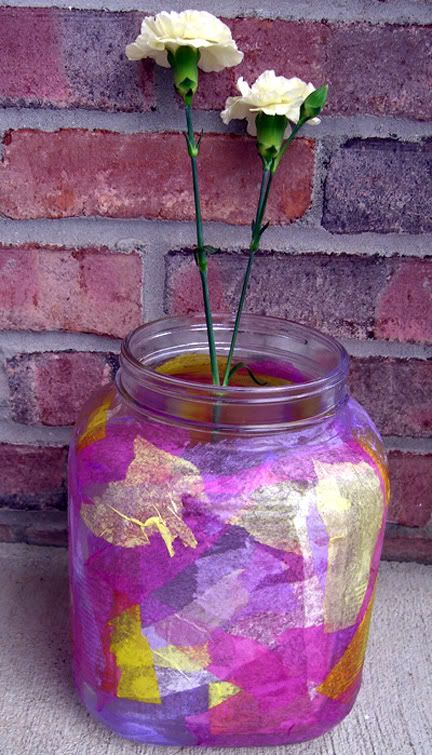
PROJECT OVERVIEW:
Recycle a glass container into a beautiful decoupage vase. Glue tissue paper squares onto the glass vase creating a unique color pattern.
SUPPLY LIST:
- Empty glass bottle/container that has the following:
- good vase-like shape
- smooth glass surface (no ridges or bumps in the glass)
- removable wrapper (so that it is a plain glass "vase" when removed)
**WARNING: The safest containers to use are empty food & beverage containers. Do not use a container that held dangerous chemicals/cleaners.
- colored tissue paper (2-5 different tissue paper colors)
- glue
- paper towel
- scissors (optional)
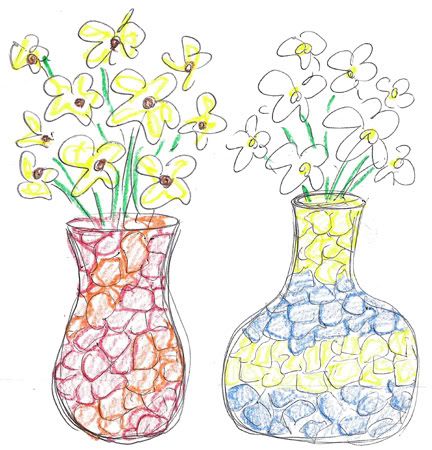
DIRECTIONS: (refer to sketches above)
1) Find a glass bottle with the above qualities to use as your vase. Below are some container ideas for a vase:
- glass salad dressing bottle (some have really unique shapes)
- glass beverage bottle (juice bottles, soda bottles, etc)
- glass vinegar or olive oil bottle (some olive oil bottles have unique square sides)
2) Have an adult rinse out/clean your vase container and peel off the outside label. *TIP: Soak in hot sudsy water to loosen stubborn labels. Let dry.
3) Select several tissue paper colors to design a pattern for your vase. 2-4 colored patterns work best.
4) Rip or cut uniform tissue paper squares to decorate your vase. Squares should be roughly 1/2" x 1/2" size for easy designing. Try to eyeball how many squares your vase will need (this depends on the size of your vase). NOTE: Ripping tissue squares will create a different effect than scissor cutting.
5) Starting from the bottom of your vase up... apply a THIN layer of glue about 1/2 way up the bottle. *NOTE: Do not cover your entire vase with glue or it may dry by the time you are ready to decorate. Decorate in sections instead.
6) Glue tissue squares onto vase pressing slightly on each square so that the entire tissue paper piece is adhered to glass. Dab any excess glue with a paper towel.
7) Create a pattern using the colors you selected. For example: stripes, polka-dots, swirls, squares, hoops, etc. Repeat the pattern until you reach the top of your vase and all glass is covered by tissue paper pieces.
8) Set aside to dry.
9) Fill vase with water and flowers! *TIP: There are many beautiful wild flowers and grasses that make a unique arrangement. Silk flowers are wonderful too!


1 comment:
The color choices can be difficult sometimes, but my son had his mind set on purple and yellow. We used three different shades of yellow tissue paper and three different shades of purple tissue.
The project doesn't need much tissue paper at all. My son tore up one sheet of each of the colors and we have a ton left. He really liked the idea of the torn tissue paper, but you could also cut pieces. Each will give a unique look.
This project is very inexpensive, since you can recycle a jar, use a bit of recycled tissue, and then use white glue...and that's it.
We also used a sponge brush for applying the glue. It is definitely best to work in small sections, as the glue dries fast and little kids just don't work as quickly.
My son wanted to take his time and he really thought about placement of the tissue paper colors. He just did a random pattern, but he did pay attention to mixing the colors as evenly as possible. He also thought about doing a pattern, so we are going to use the left over torn tissue paper to do another one.
This project was quicker to do than some of the more recent ones. Kids sometimes enjoy those kinds of projects that come together quickly, so they get that instant gratification. Travis is really proud of his piece of art.
Travis thought flowers in the vase would be pretty, but he had a few other ideas, as well. He thought of a candy container, cookie jar, pencil holder, and a lot more ideas. He wants to give the vase to his teacher with flowers in it and then a bag of candy on the side and let her know that after the flowers, she can wash the inside of the jar out and use it for candy. He thinks it will look nice in the classroom.
If the project is a vase, you don't need a cover, but if you use it for a cookie jar, etc., the cover is handy. The cover could be decorated with ribbons, buttons, beads, etc. to make it even nicer.
You could add a ribbon bow around the neck of the container/jar/vase when you give it as a gift and even add a little gift tag.
I would definitely suggest to everyone to start saving their glass containers and give this fun project a try. Children would be so excited to give art like this as a gift to teachers, parents, grand parents, etc.
- Susan
Post a Comment